
Parts lifecycle
Building a snap involves processing one or more Parts. Each part follows an ordered series of build steps, which forms the lifecycle, ensuring a coherent and reproducible build process.
This page explains how parts work within Snapcraft – including their steps, commands, directories, and dependencies.
Lifecycle steps
During build, a part goes through five steps:
Pull. Downloads or otherwise retrieves the components needed to build the part.
The
sourcekeys of a part specify which components to retrieve. For instance, ifsourcepoints to a Git repository, the pull step will clone that repository.Build. Constructs the part from the previously pulled components.
The
pluginof a part specifies how it is constructed. The Meson plugin, for example, runsmesonandninjato compile source code.Each part is built in a separate directory, but it can use the contents of the staging area if it specifies a dependency on other parts using the
afterkey. See the Processing order and dependencies section for details.The
organizekey moves and renames files.Stage. Copies the built components into the staging area.
This is the first time all the different parts that make up the snap are actually placed in the same directory. It’s possible for multiple parts to provide clashing file names. The
stagekey allows or blocks files coming from the part to circumvent such conflicts. It’s also used to filter out files that aren’t required in the snap itself, such as build files specific to a single part.Prime. Copies the staged components into the priming area.
This is very similar to the stage step, but files go into the priming area instead of the staging area. The prime step exists because the staging area might still contain files that are required for the build but not for the snap. For example, if a part downloads and installs a compiler, then this part should be staged so that other parts can use the compiler during build. The
primekey could then filter the compiler from the priming area, so it doesn’t take up space inside the snap.The
permissionskey controls file permissions.Some extra checks are also run during this step to ensure that all dependencies are satisfied for a proper run time. If the snap uses classic confinement, then files will be scanned and, if needed, patched to work with this confinement mode.
Pack. Takes the entire contents of the
primedirectory and packages it into a snap.
Commands
Each step in the lifecycle has a corresponding command in Snapcraft. This allows developers to manually run through the steps, aiding in debugging and understanding snaps. The command can be part-specific, or applied to all parts.
The commands are, in order:
snapcraft pull [<part-name>]snapcraft build [<part-name>]snapcraft stage [<part-name>]snapcraft prime [<part-name>]snapcraft pack
Each command executes the previous lifecycle steps, so snapcraft stage runs the pull
and build steps first, while snapcraft pack chains all the lifecycle steps together,
in order.
To enter the part environment at any stage, add the --shell argument to these
commands. For example, snapcraft prime --shell will run up to the prime step and
open a shell. See Iterating over a build for more practical details.
Directories
When running through its lifecycle steps, a part will use different working directories. The directories’ names closely follow the steps’ names.
Directory |
Environment variable |
Purpose |
|---|---|---|
|
|
The location of the source after the pull step. |
|
|
The working directory during the build step. |
|
|
Contains the results of the build step and the stage packages. It’s also the
directory where the |
|
|
Shared by all parts, this directory contains the contents of each part’s
|
|
|
Shared by all parts, this directory holds the final components after the prime step. |
The current project’s path in the filesystem. |
|
Used to access resources from the project’s subtree, such as an icon or version file. |
Overriding a step
Each plugin defines the default actions that happen during a step. This behavior can be changed in two ways:
With the
override-<step-name>key. See Override build steps for guidance.(core20 only) With a local plugin, which can inherit the parent plugin or scaffolding from the original. See Writing local plugins for details.
Processing order and dependencies
Each lifecycle step depends on the completion of the previous step. During build, Snapcraft walks through one step at a time, processing that step for all parts. Within a step, the parts are processed in alphabetical order. Only after a step is complete for every part will it continue to the next step.
Overriding the part order
The part order can be overriden by the after key in the part’s definition. The
purpose of the key is to stagger the part order so that interrelated parts can provide
data to each other.
With after, the part order follows modified rules:
Parts are ordered alphabetically by name, as usual.
When the build reaches a part that another depends on, the dependent part will only start its build and stage steps after the initial part finishes its stage step.
After a chain of parts completes, the step continues to the next part in alphabetical order.
Example 1 – Default lifecycle
In this example, the default order applies. Each step is processed serially, and within each step the parts are processed in alphabetical order.
parts:
  Alex:
    plugin: go
  Cam:
    plugin: go
  Blair:
    plugin: go
Pulling AlexPulling BlairPulling CamBuilding AlexBuilding BlairBuilding CamStaging AlexStaging BlairStaging Cam...Example 2 – Order override
parts:
  Alex:
    plugin: go
    after:
      - Cam
  Blair:
    plugin: go
  Cam:
    plugin: go
Pulling CamPulling AlexPulling BlairBuilding CamSkipping pull for Cam (already ran)Skipping build for Cam (already ran)Staging Cam (required to build 'A')Building AlexBuilding BlairSkipping stage for Cam (already ran)Staging AlexStaging Blair...In the above example, the part named A is built after the part named C has been
successfully built and staged.
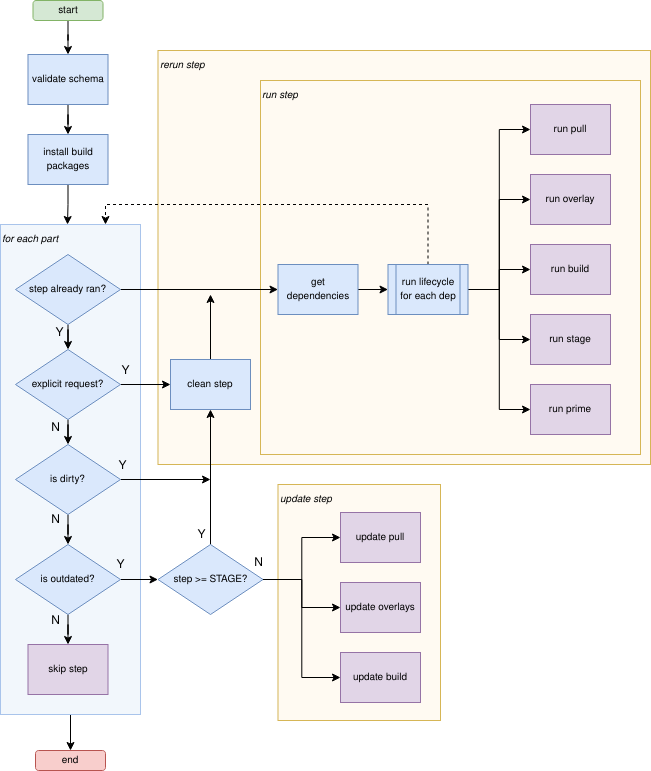
Lifecycle processing diagram
Learn more
For more information about the parts lifecycle, see the following resources:
Parts environment variables has a list of part-specific environment variables that can be accessed at build time.
Scriptlets has more details on how to override steps.
Lifecycle in the Craft Parts documentation.